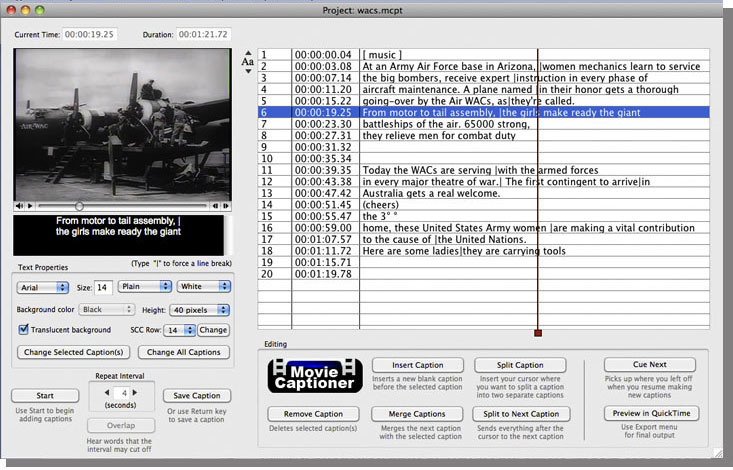
MovieCaptioner
See how easy it is to caption your videos. Just load your movie, set your text/background properties, then click the Start button. MovieCaptioner will start playing the first 4 seconds of your video in a loop. Just type what you hear in that loop and then hit your Return/Enter key to record that caption and it's starting timecode. MovieCaptioner will then automatically move on to the next 4 seconds of your movie. Just keep typing and hitting your Return/Enter key until you've captioned your entire movie. It couldn't be simpler! If you can type, you can make your videos accessible for the deaf, increase your search engine optimization (SE0), and open your videos up to a much wider audience. Read the full review about MovieCaptioner.

EmailScraper

EmailScraper makes it easy to extract email addresses from CSV, TXT, DOCX files, and websites. It will find just the emails so you can export them as a single list to import into your favorite mail program. You can filter your list by domain as well (like .com, .org, .edu, etc.), and search by any word you wish to narrow down your results. For instance you can target a school or college audience by filtering for only ".edu" addresses or a government audience by filtering ".edu" or ".gov" addresses.
- You can search a single file or a folder of files.
- Subfolders are automatically searched unless you uncheck the Search Subfolders box.
- Search results can be saved as either tab-delimited or comma-separated text that can be opened in Excel or uploaded to your favorite email program.
SCC Caption Decoder

Have an SCC caption file that you need to translate into human-readable text transcripts? Need to find where that error is in your SCC captions? This closed captioning decoder is exactly what you need, and a great companion tool for MovieCaptioner. Just select your SCC file and it will save it as a new text transcript with timecode. The timecode can either stay the same as the SCC file (very useful for troubleshooting) or it can remove the buffer time that SCC files build in, making the timecode closer to the actual time the captions are displayed. You can also opt to output as paragraph text without timecode. By providing text transcripts of your movies on your Web site, you will not only be providing accessibility, but you will also improve your search engine optimization by providing searchable content. It can now batch-process a whole folder of files, or enable the hot folder to check for new SCC files every so many minutes. It will auto-process any SCC files it finds in your hot folder and copy the original files to an archive on your destination folder along with the decoded transcripts.
More Info Download Demo Buy NowScreenCaptureX

ScreenCaptureX captures your computer screen in 3 different ways. Just choose which type of image you want to capture, then click the Capture Screen button. It will save it as a JPEG (numbered sequentially) to your Desktop. Simple, huh? Need to grab a still from a DVD? ScreenCaptureX can do it!
More Info Free DownloadGet Started with Video Captioning
(free ebook!)
(Guía de iniciación para hacer accesibles sus videos)
This book is for anyone new to captioning video who wants to learn more about the subject. It discusses the reasons that video should be captioned, the many different caption file formats and how to create them, helpful software to use, captioning style guidelines, and helpful links to more information.
Available for free in the iBook Store for your Mac or iOS device or as a PDF. También disponible en español: Introducción A La Subtitulación De Videos
More Info